Using the Android App
Accessing your files on your Cloud-Sync server via the Web interface is easy and convenient, as you can use any Web browser on any operating system without installing special client software. However, the Android app offers some advantages over the Web interface:
-
A simplified interface that fits nicely on a tablet or smartphone
-
Automatic synchronization of your files
-
Share files with other Cloud-Sync users and groups, and create multiple public share links
-
Upload of photos and videos recorded on your Android device
-
Easily add files from your device to Cloud-Sync
Installing
One way to get your ownCloud Android app is to log into your Cloud-Sync server from your Android device using a Web browser. The first time you log into a new Cloud-Sync account, you’ll see a screen with a download link to the ownCloud app in the Google Play Store. In your customer area you will find the same link.

Connecting to Cloud-Sync
The first time you run the Android app, it opens to a configuration screen. Enter your Cloud-Sync server URL, login name, password, and click the Connect button. Click the eyeball to the right of your password to expose your password.
With that completed, you’re now ready to use the Android application. At this point, you’ll be on the “All Files” screen, which you see below.
Files
All Files
When you are in the “All Files” view, all files that you have permission to access on your ownCloud server are displayed in your Android app. However, they are not downloaded until you click on them. Downloaded files are marked with a green tick, on the top-right of the file’s icon.
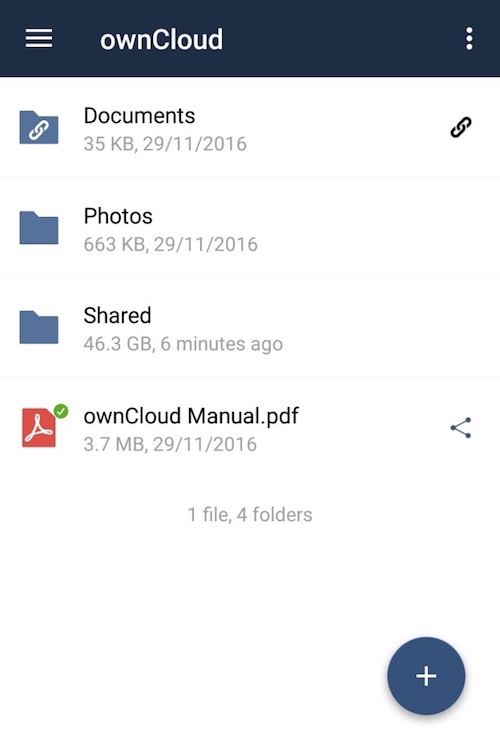
Videos don’t need to be downloaded before they can be viewed, as they can be streamed to the device from your Cloud-Sync server.
Download and view a file with a short press on the file’s name or icon. Then, a short press on the overflow button opens a menu with options for managing your file.
When you are on your main Files page and you long press on any file or folder a list of options appears. Some of them appear in the top bar. The ones that don’t fit in the top bar, appear in the list of options when pressing the overflow button.
Sharing Files
You can share with other Cloud-Sync users and groups, and create public or private share links.
To share a file, you first need to either:
- Long-click its name, and click the share icon at the top of the screen
- Click its name and then click the share icon at the top of the screen
The dialog which appears shows a list of users and groups with whom the file is already shared, as well as a list of one or more public links.
From here you can:
- Share one link to the file with users of the same Cloud-Sync server
- Share the file with one or more users and groups
- Share one or more links to the file via a range of options
- Enable password protection - Set a share expiration date
To create a private link, click the link icon on the right of the file name.
To share the file with a new user or group, click the plus sign next to “Users and Groups”, where you will be able to find and add them to the share list. After a user or group has been added, you can adjust the editing and on-sharing options available for them.
To create a public link, click the plus symbol next to “Public Links”. This will display the options available for that link, including “Allow editing”, “Password”, and “Expiration”. After the options have been suitably configured, click “Save” to create the link. If you do not want to create the public link, click “Cancel”.